Import Sales Returns from Excel to Sage 200
This tutorial is part of a series of tutorials on Excel to Sage 200 integration using the popular Excel add-in: Excelerator.
In this tutorial, we’ll demonstrate how you can download sales orders for a specific date, review changes and generate order returns from within an Excel spreadsheet. To see this live, book a free demo.
View a video of this tutorial here:
Maintain Sage 200 Sales Returns Using Our Spreadsheet Template
Once you have opened Excel and you are logged into Excelerator using your Sage credentials you can begin.
Each module comes with a standard Excel file template, for this example we will use the single Sales Return template.
One of the great features of Excelerator is that it will allow you to browse your Sage data from the template. You simply right-click and select 'Browse Records'.
Once you have clicked browse records, a selection box will appear on your Excel spreadsheet. Simply select the customer you would like download onto your template.
After you have selected the customer, you are ready to fill out the rest of the template. Choose the Document Date, and select the default Warehouse.
Next you will enter the line details. select the product, confirm the warehouse, enter the quantity, and selling unit price.
Another feature of Excelerator is the Calculate Button. This will calculate the values in the template, eliminating the need to calculate the tax value and total sum amount yourself.
The Validate button will check if the sheet is consistent with Sage rules. When you are happy click Save to Sage to upload all this data to Sage 200.
If you go across to Sage 200, click refresh, and you can see that the return has been saved.
Custom spreadsheet templates
Your Excelerator comes with a standard Excel file which includes single and multiple templates.
The Sales Returns module not only comes with standard templates, but also the Spreadsheet Designer, which allows you to customise and design your own templates to suit your requirements.
To demonstrate this we will download existing transactions and generate a new Sales Return.
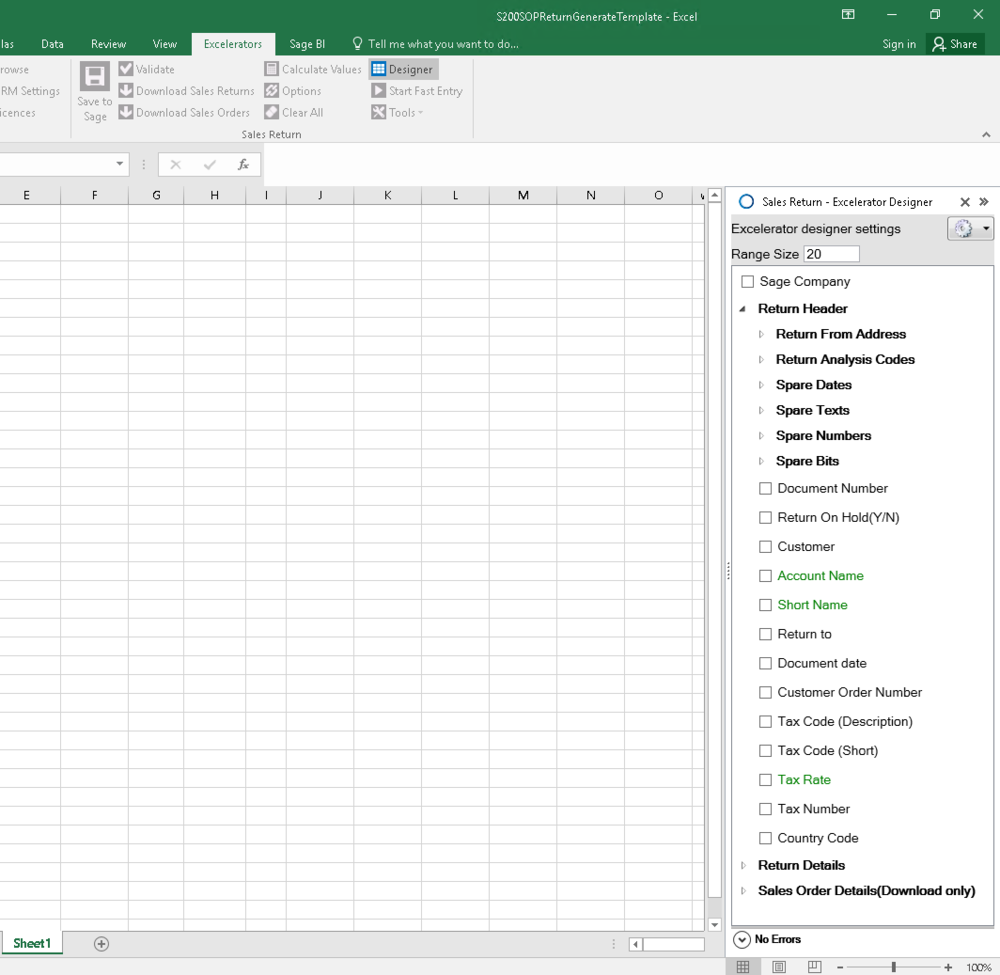
When you open up the designer, a panel will open up on the right with all the standard Sage fields available.
Before you start picking the fields, you will be able to enter the number rows you will require in the 'range size' option in the Designer panel. You can choose as many rows as you wish. It could be 50, 100, 1000, etc. It's entirely up to you.
When you have decided the amount of rows you will need, you can start picking the fields you will require.
In this example we will select the following document number, customer, account name, document date, item line number, stock code, warehouse, item description, quantity, selling unit price, and Order line quantity.
With Sales Returns you can download existing Sales Returns, or a previous Sales Order as a basis to create a new Sales Return. On this occasion you will select Download Sales Orders where you can choose the Sales Order to use.
Once in the spreadsheet you can now enter the quantity to return for each line.
The original order quantity for each line is also visible.
When you are happy with the spreadsheet, you can click Save to Sage to upload the Sales Return to Sage.
The Sales Returns module makes returning an order in Sage simple, quick, and effective.
A very useful feature of the Sales Returns module is the ability to input several sales order returns from different customers in one easy to use worksheet.
It also allows Sales teams to quickly prepare credit notes that are to be authorised by Accounts.
There you have it, your own custom made Excelerator template ready to download, edit, create & browse Sage 200 Sales Returns.
Where to go from here
Download the latest release of Excelerator now.
View Excelerator in action with our tutorials.
For help with Excelerator, check out our online Excelerator Help.
Contact us to find out more about this new update, see a demo, or learn about upgrades.


